首页 map[addtime:<nil> column:0 data:{"status":0,"msg":"","data":{"data":{"banner":[{"image":"/assets/upload/2024/10/09/8321b9b943cd4f57fe891334012bebb1.png","t1":"感恩有你,未来可期","t2":"","t3":"/p/2802"}],"name1":"新闻资讯"}}} data2:<nil> description:16年IT服务经验-全国服务电话:400-017-5181 featured: id:1 illustrate:新闻资讯 keywords:同创双子公司新闻, 同创双子,同创双子怎么样,同创双子公司,成都同创双子,北京同创双子,同创双子最新新闻 name:新闻资讯 orders:1 state:true tag:<nil> templateslist:{ "controls": [ { "name": "data.name1", "label": "简单标题", "type": "input-text" }, { "type": "combo", "name": "data.banner", "label": "轮播", "multiple": true, "draggable": true, "items": [ { "name": "t1", "label": "标题", "type": "input-text" }, { "name": "t2", "label": "时间", "type": "input-text" }, { "name": "t3", "label": "连接", "type": "input-text" }, { "type": "input-image", "name": "image", "label": "配图", "receiver": "./api/upload?rich=2" } ] } ] } templatespage:{ "controls": [ { "label": "推荐等级", "type": "select", "name": "featured", "options": [ { "label": "不推荐", "value": 0 }, { "label": "首页推荐", "value": 1001 } ] }, { "type": "group", "body": [ { "name": "data.listimg", "label": "列表图片", "receiver": "./api/upload?rich=2", "type": "input-image" }, { "name": "data.img", "label": "首页图片", "receiver": "./api/upload?rich=2", "type": "input-image" } ] }, { "type": "input-rich-text", "name": "data.body", "label": "文章内容1", "receiver": "post:./api/upload?rich=1" } ] } title:新闻资讯-同创双子(北京)信息技术股份有限公司 tmpllist:list tmplpage:page url:news] > 新闻资讯 map[addtime:<nil> column:1 data:{"status":0,"msg":"","data":{"data":{"banner":[{"image":"/assets/upload/2023/12/13/3e1643bd17c60956f27ddf735eb3048d.png","t1":"桌面运维是什么?外包好还是自招好","t3":"https://www.itgemini.net/p/2613"},{"image":"/assets/upload/2023/12/13/d52a5f367538356cbcbfbbf727a5e0a7.png","t1":"什么是系统集成?同创双子可以做哪些系统集成服务","t3":"https://www.itgemini.net/p/2611"}],"name1":"干货分享"}}} data2:<nil> description:16年IT服务经验-全国服务电话:400-017-5181 featured: id:3 illustrate:干货分享 keywords:同创双子公司新闻, 同创双,同创双子公司,成都同创双子,北京同创双子,同创双子最新新闻,电脑卡顿,电脑故障,网络故障 name:干货分享 orders:1 state:true tag:<nil> templateslist:{ "controls": [ { "name": "data.name1", "label": "简单标题", "type": "input-text" }, { "type": "combo", "name": "data.banner", "label": "轮播", "multiple": true, "draggable": true, "items": [ { "name": "t1", "label": "标题", "type": "input-text" }, { "name": "t2", "label": "时间", "type": "input-text" }, { "name": "t3", "label": "连接", "type": "input-text" }, { "type": "input-image", "name": "image", "label": "配图", "receiver": "./api/upload?rich=2" } ] } ] } templatespage:{ "controls": [ { "label": "推荐等级", "type": "select", "name": "featured", "options": [ { "label": "不推荐", "value": 0 }, { "label": "首页推荐", "value": 1001 } ] }, { "type": "group", "body": [ { "name": "data.listimg", "label": "列表图片", "receiver": "./api/upload?rich=2", "type": "input-image" }, { "name": "data.img", "label": "首页图片", "receiver": "./api/upload?rich=2", "type": "input-image" } ] }, { "type": "input-rich-text", "name": "data.body", "label": "文章内容", "receiver": "post:./api/upload?rich=1" } ] } title:干货分享-IT技巧-同创双子(北京)信息技术股份有限公司 tmpllist:list tmplpage:page url:share] > 干货分享
正版OFFICE 2019 安装步骤

发布日期:2018/11/22 08:00:00

  OFFICE2019安装条件

  1) 必须在windows10的操作系统下进行安装

  2) 必须在有网的环境下进行

  1.访问下面链接下载部署工具

  https://apac01.safelinks.protection.outlook.com/?url=https%3A%2F%2Fdocs.microsoft.com%2Fzh-cn%2FDeployOffice%2Foffice2019%2Fdeploy%23deploy-languages-for-office-2019&data=02%7C01%7C%7Ce86f41a97da7422b2d1c08d5944ee31e%7C72f988bf86f141af91ab2d7cd011db47%7C1%7C0%7C636758766819299678&sdata=KHNIpvrBXniYfY3yDTQoXouru5hIJ2DjzFuVNzZCktI%3D&reserved=0

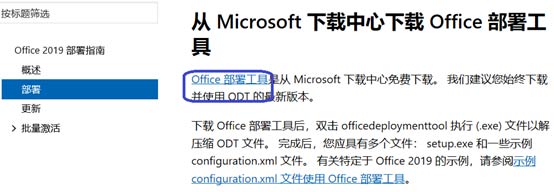
  2.选择office部署工具进行下载
OFFICE2019安装步骤

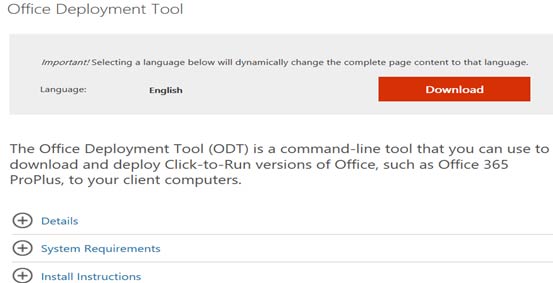
  3.选择Download进行下载

OFFICE2019安装步骤

  4.下载完成后放在D盘,建议安装在根目录下,以便后续操作

OFFICE2019安装步骤

  5.打开ODT部署工具之后,用记事本(TXT)打开下图中的configuration -office 2016 x64的文件(选中文件右键-打开方式-记事本),用以下代码代替文件中的代码
OFFICE2019安装步骤

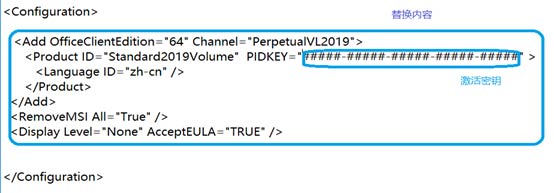
  6.用以下代码代替文件中的代码

  安装文件为本地安装,为 PIDKEY,替换 MAK 客户端激活密钥 ###-###-###-###-###

<Configuration>

<Add OfficeClientEdition="64" Channel="PerpetualVL2019">

<Product ID="Standard2019Volume"  PIDKEY="#####-#####-#####-#####-#####" >

<Language ID="zh-cn" />

</Product>

</Add>

<RemoveMSI All="True" />

<Display Level="None" AcceptEULA="TRUE" />

</Configuration>

  7.开始键运行CMD右键以管理员身份运行,在CMD中退回到根目录的文件夹

  F:----cd office

OFFICE2019安装步骤

  8.输入命令 : setup /download configuration.xml 下载安装的压缩包

OFFICE2019安装步骤

  9.完成后目录中将出现一个新的Office文件夹 文件大小为2.96G

OFFICE2019安装步骤

  10.最后输入命令:setup /configure configuration.xml,正式进入安装的进程

OFFICE2019安装步骤

  11.安装或者下载压缩包时下面会有光标闪动,等待安装或者下载即可,时间较长,

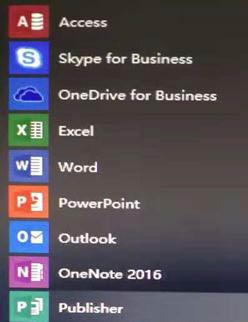
  安装完成后开始菜单栏查看即可,如下图
OFFICE2019安装步骤

  备注:

  Office2019一共有八个组件分别是

  Access、 Excel、 Outlook、 PowerPoint、Word、OneNote、Publisher、

  Skype for Business’


同创双子为企业保驾护航

专注数字化方案建设,推动智慧企业生态圈的升级发展