首页 map[addtime:<nil> column:0 data:{"status":0,"msg":"","data":{"data":{"banner":[{"image":"/assets/upload/2024/10/09/8321b9b943cd4f57fe891334012bebb1.png","t1":"感恩有你,未来可期","t2":"","t3":"/p/2802"}],"name1":"新闻资讯"}}} data2:<nil> description:16年IT服务经验-全国服务电话:400-017-5181 featured: id:1 illustrate:新闻资讯 keywords:同创双子公司新闻, 同创双子,同创双子怎么样,同创双子公司,成都同创双子,北京同创双子,同创双子最新新闻 name:新闻资讯 orders:1 state:true tag:<nil> templateslist:{ "controls": [ { "name": "data.name1", "label": "简单标题", "type": "input-text" }, { "type": "combo", "name": "data.banner", "label": "轮播", "multiple": true, "draggable": true, "items": [ { "name": "t1", "label": "标题", "type": "input-text" }, { "name": "t2", "label": "时间", "type": "input-text" }, { "name": "t3", "label": "连接", "type": "input-text" }, { "type": "input-image", "name": "image", "label": "配图", "receiver": "./api/upload?rich=2" } ] } ] } templatespage:{ "controls": [ { "label": "推荐等级", "type": "select", "name": "featured", "options": [ { "label": "不推荐", "value": 0 }, { "label": "首页推荐", "value": 1001 } ] }, { "type": "group", "body": [ { "name": "data.listimg", "label": "列表图片", "receiver": "./api/upload?rich=2", "type": "input-image" }, { "name": "data.img", "label": "首页图片", "receiver": "./api/upload?rich=2", "type": "input-image" } ] }, { "type": "input-rich-text", "name": "data.body", "label": "文章内容1", "receiver": "post:./api/upload?rich=1" } ] } title:新闻资讯-同创双子(北京)信息技术股份有限公司 tmpllist:list tmplpage:page url:news] > 新闻资讯 map[addtime:<nil> column:1 data:{"status":0,"msg":"","data":{"data":{"banner":[{"image":"/assets/upload/2023/12/13/3e1643bd17c60956f27ddf735eb3048d.png","t1":"桌面运维是什么?外包好还是自招好","t3":"https://www.itgemini.net/p/2613"},{"image":"/assets/upload/2023/12/13/d52a5f367538356cbcbfbbf727a5e0a7.png","t1":"什么是系统集成?同创双子可以做哪些系统集成服务","t3":"https://www.itgemini.net/p/2611"}],"name1":"干货分享"}}} data2:<nil> description:16年IT服务经验-全国服务电话:400-017-5181 featured: id:3 illustrate:干货分享 keywords:同创双子公司新闻, 同创双,同创双子公司,成都同创双子,北京同创双子,同创双子最新新闻,电脑卡顿,电脑故障,网络故障 name:干货分享 orders:1 state:true tag:<nil> templateslist:{ "controls": [ { "name": "data.name1", "label": "简单标题", "type": "input-text" }, { "type": "combo", "name": "data.banner", "label": "轮播", "multiple": true, "draggable": true, "items": [ { "name": "t1", "label": "标题", "type": "input-text" }, { "name": "t2", "label": "时间", "type": "input-text" }, { "name": "t3", "label": "连接", "type": "input-text" }, { "type": "input-image", "name": "image", "label": "配图", "receiver": "./api/upload?rich=2" } ] } ] } templatespage:{ "controls": [ { "label": "推荐等级", "type": "select", "name": "featured", "options": [ { "label": "不推荐", "value": 0 }, { "label": "首页推荐", "value": 1001 } ] }, { "type": "group", "body": [ { "name": "data.listimg", "label": "列表图片", "receiver": "./api/upload?rich=2", "type": "input-image" }, { "name": "data.img", "label": "首页图片", "receiver": "./api/upload?rich=2", "type": "input-image" } ] }, { "type": "input-rich-text", "name": "data.body", "label": "文章内容", "receiver": "post:./api/upload?rich=1" } ] } title:干货分享-IT技巧-同创双子(北京)信息技术股份有限公司 tmpllist:list tmplpage:page url:share] > 干货分享
业IT工程师的Mac系统重装指南

发布日期:2023/05/09 08:00:00

哈喽  

艾瑞巴蒂

新的一年小双化身为技术小妖怪(专业对付各类IT难题)


3552101000.gif

这期我们来看看Mac系统的重装指南

Mac系统虽然比windows系统稳定但难免也会出现系统假死,卡顿,反应慢等现象,出现这些问题的时候我们该怎么重装呢?

重新安装系统有三种方法,各取所需: 

(1)使用苹果自带的联网恢复功能进行安装(适合进不了系统的,最好但是耗时) 

(2)制作U盘启动进行安装(适合进不了系统的,快但是肯能会遇到一些问题,比较复杂) 

(3)从appstore下载进行安装(最简单,适合升级系统)
11.jpg

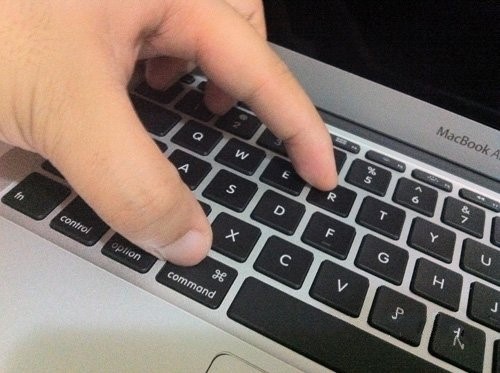
第一种相对比较简单,开机的时候按住command+r,等待他下载完成。

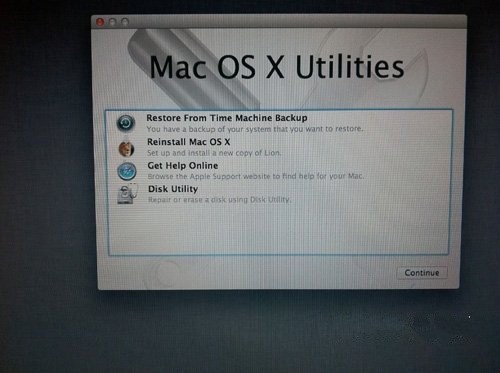
2、接着就有一个弹窗,此时可以松手,可以看到有 4 个选项:

Restore From Time Machine Backup 可以帮你从过去备份至 Time Machine 的映像档回復电脑、

Reinstall Mac OS X 顾名思义就是重新安装 Mac OS X Lion;

Get Help Online 则是从线上撷取帮助档了解重装步骤及常见问题;

Disk Utility 是管理硬碟,包括:分割磁区、将磁碟区格式化等。
 

12.jpg

直接选择第二项即可,但有个前提是必须得连接上网络。

第二种方法是使用U盘进行重新安装

制作U盘启动。U盘最好是8g或者8g以上。 

首先你要先下载系统,下载系统有两种方式: 

(1)从其他地方下载,这里分享我的收藏,有很多种版本,下载你最需要的系统版本:链接: https://pan.baidu.com/s/1nuN5bKl  密码: 9h4m

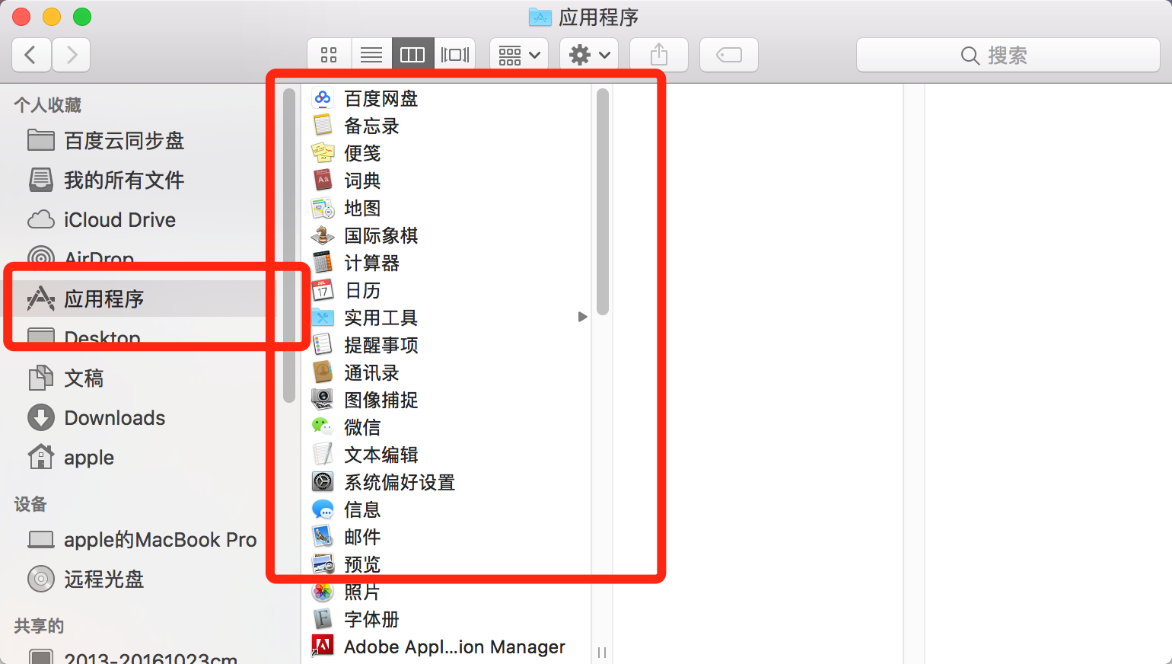
(2)从appstore下载,一般都是只能下载到最新的系统,而且是你在appstore那里,曾今下载或者购买过的。如果下载下来是一个dmg文件,双击打开,把里面面的安装文件,复制到我们电脑的应用程序文件夹:
13.png


如果是从appstore下载,他直接 就帮你下载到这个应用程序文件夹里面了。 

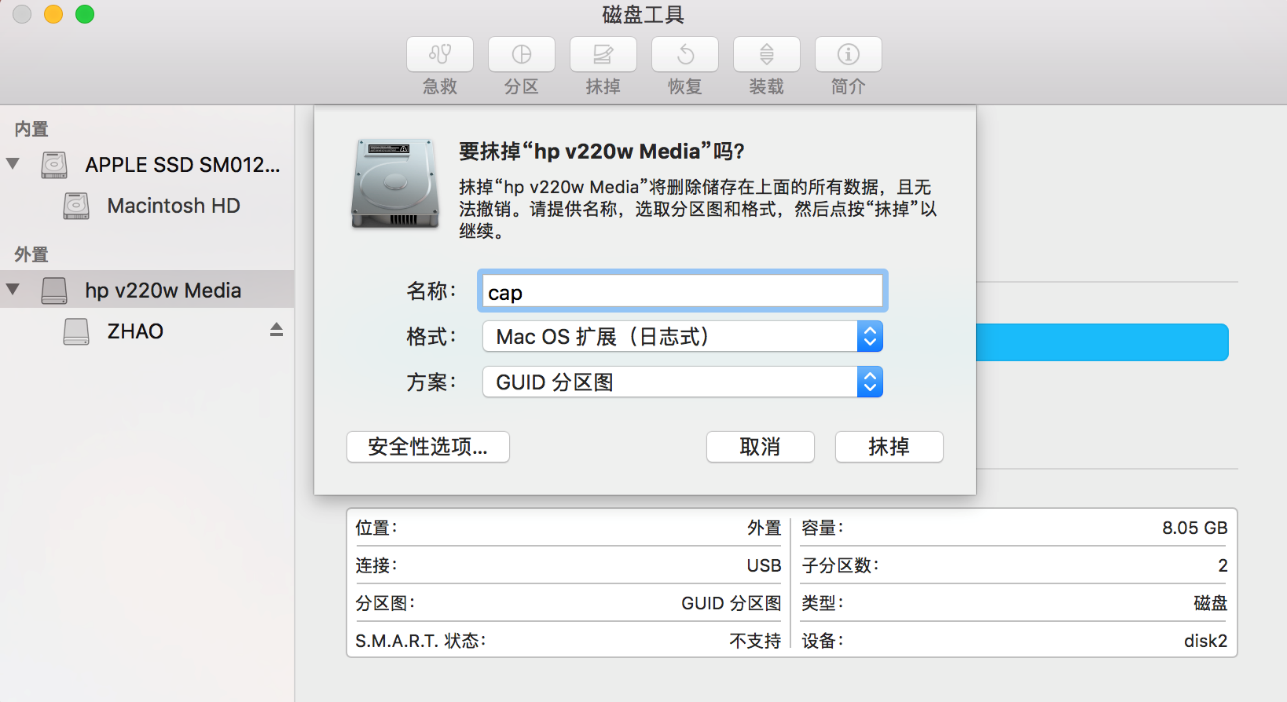
然后我们先来格式化你准备的u盘, 
 

14.png

点击抹掉 就可以了。这样u盘就搞定了。 

接下来用命令行来进行制作,也可以用diskmaker,但是个人不建议用这个工具。 

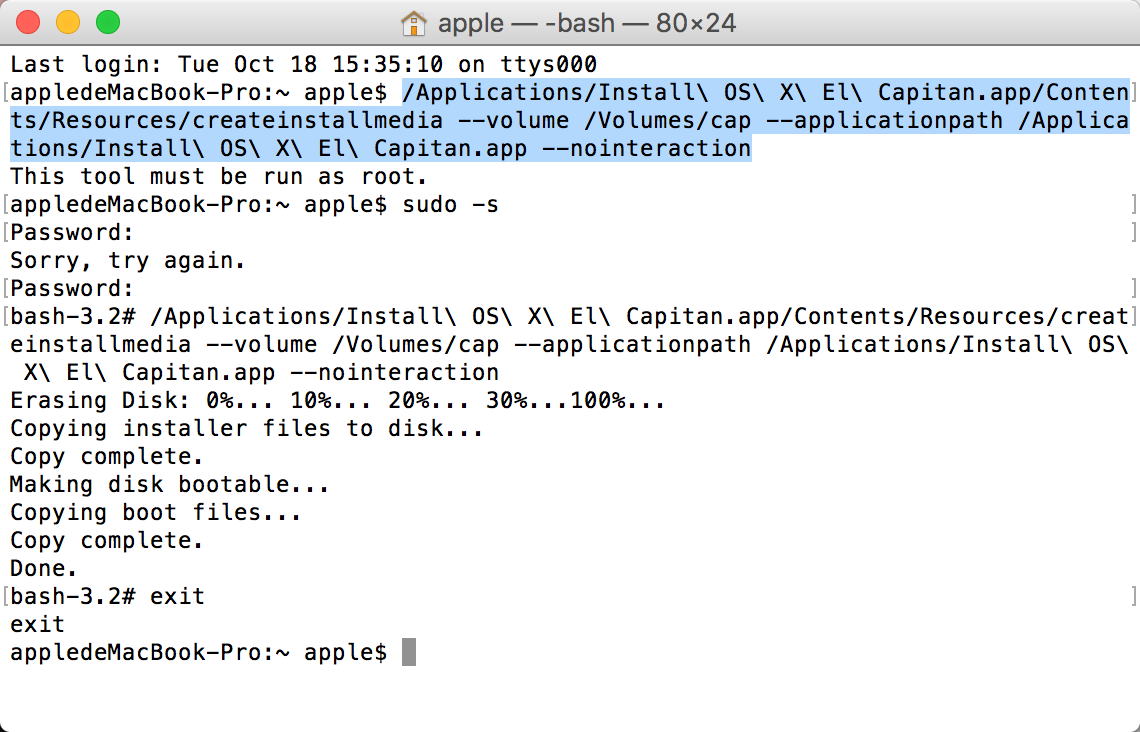
先打开终端,复制下面命令,修改一下,然后在终端粘贴:

sudo /Applications/Install\ OS\ X\ Yosemite.app/Contents/Resources/createinstallmedia --volume /Volumes/cap --applicationpath /Applications/Install\ OS\ X\ Yosemite.app --nointeraction

15.png

 第一个标注,如果你不知道,你这个安装包什么名字,你直接打开应用程序这个文件夹,也就是之前放安装文件那个文件夹,上面有提到的,你把那个文件拖进终端里面,就出现那个文件该怎么写了,直接复制那段命令,1和3那个位置替换成复制的那段文字就行了, 然后第二个标注,就是你之前格式化的那个U盘填的名字,前面有提到的。 修改完这段命令后,回车运行,这里有个注意问题,有时候你复制这段文字,然后先放在别的地方修改,这段命令的”- -“这两个横杠会被转换成一道大横杠或者其他的,这个时候你要在运行之前,先把转换的那个横杠替换成跟上面命令行一致的样子,运行命令才不会报错。 如果命令没有错的话,就会开始制作u启。 
 

16.png

等待制作完成就可以了。

制作完成后,插入U盘,重新启动,按住option键,如果是windows的键盘option键是alt。 

选中你的u盘启动,就能进行安装了,安装步骤跟上面的联网恢复大同小异。

第三种最简单了,直接从appstore下载 就行了 然后点击lunchpad里面的安装文件,进行安装就行了


同创双子为企业保驾护航

专注数字化方案建设,推动智慧企业生态圈的升级发展